On a crisp October sunday morning @ 6:30am, myself and 4 other students met at the Hilton Gravelpit nature reserve to take some of our own images for our assignments.
This was somewhere I had never even heard of, let alone visited before, but another student (Ian) said how beautiful it was early in the morning and arranged for some of us to get together so he could show us around the nature reserve to take some shots.
Visiting here made me realise how much the weather and time of year affect what time you visit a location to allow you to get the best light for the camera and to get the effect that is required for your images.
The trip to the nature reserve really opened my eyes to what is available and really does show that if you are willing to put in the effort and research you can find some amazing and naturally stunning places to be the subject of your photographs.
Because we had organised this trip in advance I arranged to borrow one of the camera's and tripod's from college so that I could experiment properly with the manual features and gain more experience. I used a Canon EOS Digital DC 8.1V with zoom lens set on manual and a standard tripod.
Below are some of my favourite images taken at the nature reserve with a description advising on the settings of each photograph. I have also included images that didnt work so well to show the difference and how the settings effected the outcome.
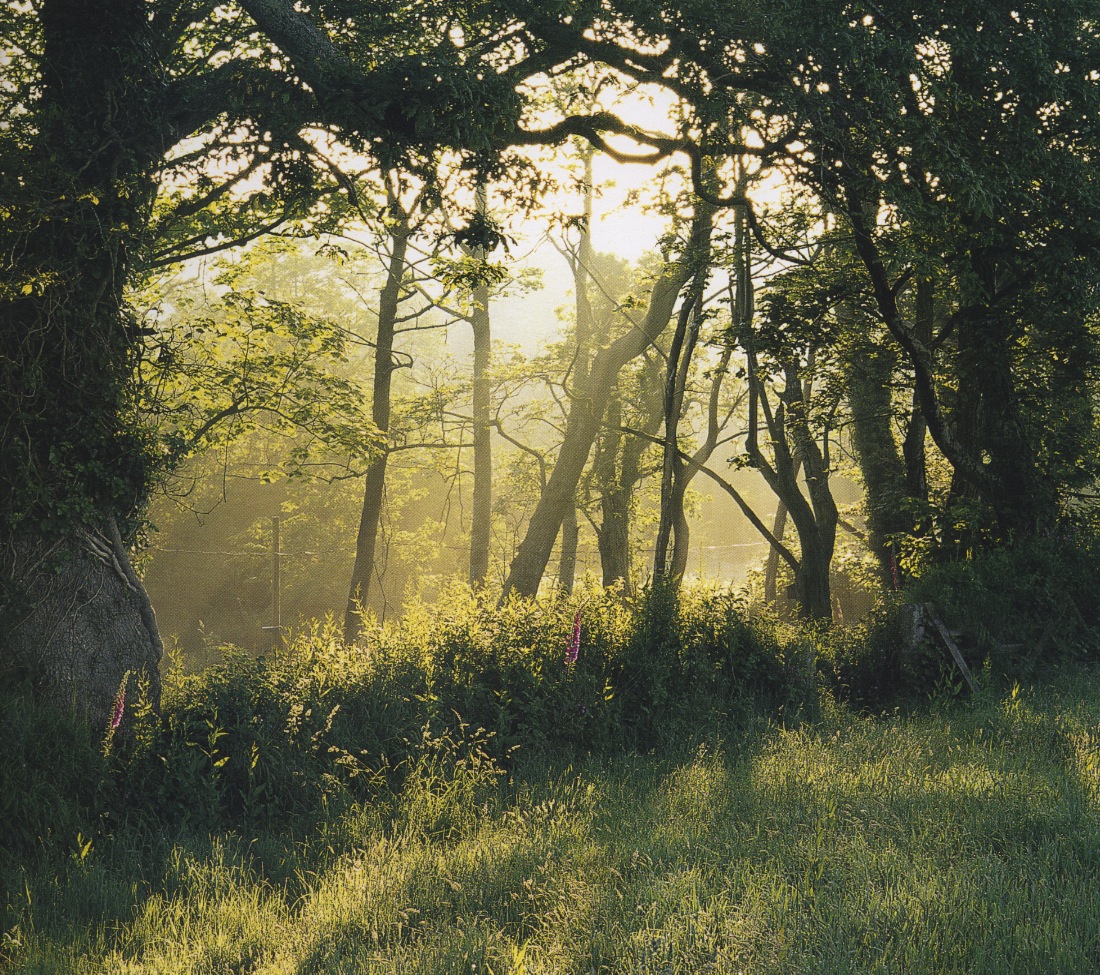
The lake

Shutter speed = 1/5, Aperture = f/13.0, ISO = 100

Shutter speed = 1/5, Aperture = f/10.0, ISO = 100

Shutter speed = 1/5, Aperture = f/20.0, ISO = 100

Shutter Speed = 1/5, Aperture = f/10.0, ISO = 100
I found that this one was too light and didnt give the overall effect I wanted and I feel that the darker images are more moody and create more of an atmosphere than this lighter photo.

Shutter speed = 1/5, Aperture = f/18.0, ISO = 100

I love the warm colours in the above image and feel it gives a sense of calm and peace. I like the way I have captured the mist on top of the lake and the sun rising behind the trees. I also like the depth of field and how the trees/branches at the front of the image act as a frame to the whole photograph. This helps draw your eyes into the photo.

In the above image I wanted to capture the trees in the background but keep them as a silohouette.

I feel that the trees to the right of this image above draw your eyes to the center of the photo and then your focus is brought out to the left.


Shutter speed = 1/8, Aperture = f/22.0, ISO = 100
The above image is probably one of my overall images of the lake. This is because I think it has a nice balance in tone and scale. I like the composition, the frame of the trees and branches around the image which draws your eyes in deeper and also the lake runs through the centre of the image which also gives it balance.

Shutter speed = 1/8, Aperture = f/4.5, ISO = 100
These images were taken to the side and behind where I was standing taking the other photos of the lake. I like how fresh the images look and they are completely different to the other images in the fact that they are more defined and more detailed. In the above I like the reflection of the 'sweeping' tree in the water and I think the focal point is to the left of the image where the light is shining through and where the branches of the tree skim the water.

Shutter speed = 1/8, Aperture = f/5.0, ISO = 100
In the above my eyes are drawn to the centre of the image straight away through the foliage. This is because the branch sweeping away from the camera almost points you in that direction. This is the reason I wanted to take this photo as I thought the composition and positioning of the subjects were different to the others images I took on this morning.
For this shoot I took inspiration from the Heligan photographer - Melanie Eclare. I love the way she uses depth of field and I like her composition and positioning as the subjects are not always central which I think makes it different and not so 'set'. Below are a couple examples of this.

 The image to the left shows how she has used the palm tree as more of a silhouette rather than the main focal point.
The image to the right shows how the branches of the tree leans back into the image which is what I draw inspiration from for some of my own images.
Close up images
Melanie Eclare also took some close up shots of flowers in the Heligan book so this is where I gained inspiration to take some of my own close up photographs. As well as flowers I have always been interested in photographs that show different textures. With this in mind I took some images of bark, wild berries and funghi and I have selected a few below. I have detailed the settings used on the camera for the shots and I have discussed what I thought works and what doesn't work in the images.

Shutter speed = 1/15, Aperture = f/4.5, ISO = 200
These berries were quite hard to take photographs of as they were higher up than my tripod would go. Because of this I had to hold the camera myself which caused the image to blur slightly as you can see from these first few photographs. However, it was still good experience and I still got to practice with the settings of the camera which is something I had never done before.

The image above was too dark and because of this the berries get lost in the background.

Shutter speed = 1/20, Aperture = f/4.5, ISO = 200
The image above of the berries has a really simple composition and the main focal point is the berries itself. I like how the light has reflected off the berries to showcase the smooth surface and texture and I like the contrast of shapes, the roundess of the berries against the leaves and tree trunk. It would have been better taken on a tripod though as it would have been alot sharper.

I wanted to take a shot from further away from the berries in this image to get a more wider angle. I like the small depth of field in this image and the light shining on the leaves.

Shutter speed = 1/20, Aperture = f/4.5, ISO = 200
This image is one of my favourite close up photographs I took on this day because I like the textures, the composition, the tones, the angle of the bark and the depth of field. I like the fact that the bark is the main focal point of the image and how the background is visible, you know what it is but its blurred and I like the effect it gives the image.

Shutter speed = 1/20, Aperture = f/4.5, ISO = 200
In this image I wanted to focus solely on the bark and the detail on it. I wanted to pick up on the moss, knots and lines on the tree as I think it offers an interesting composition.

Shutter speed = 1/20, Aperture = f/4.5, ISO = 200
Again, I wanted to focus on textures and contrast in shapes in this image. I like the composition and how the bark is at an angle in the image but I would have preferred more sunlight to bounce off the surface of the bark and the moss as I think this would have added more to it and would have created some interesting shadows.

Shutter speed = 1/20, Aperture = f/5.0, ISO = 200
This image is a similar angle and composition to the close up of the bark earlier on and the main focal point is the funghi at the left near the centre of the image. I like the moss on this photo but again it would be better with more sunlight to create shadows of the funghi on the bark.

Shutter speed = 1/40, Aperture = f/4.5, ISO = 200
I like the composition and texture of this image but this one came out too dark.

Shutter speed = 1/20, Aperture = f/4.5, ISO = 400
This one worked out alot better than the darker image. I like the sunlight shining from behind the bark and the details in the tree and the dead leaves on the ground.
Shutter speed = 1/20, Aperture = f/5.0, ISO = 200
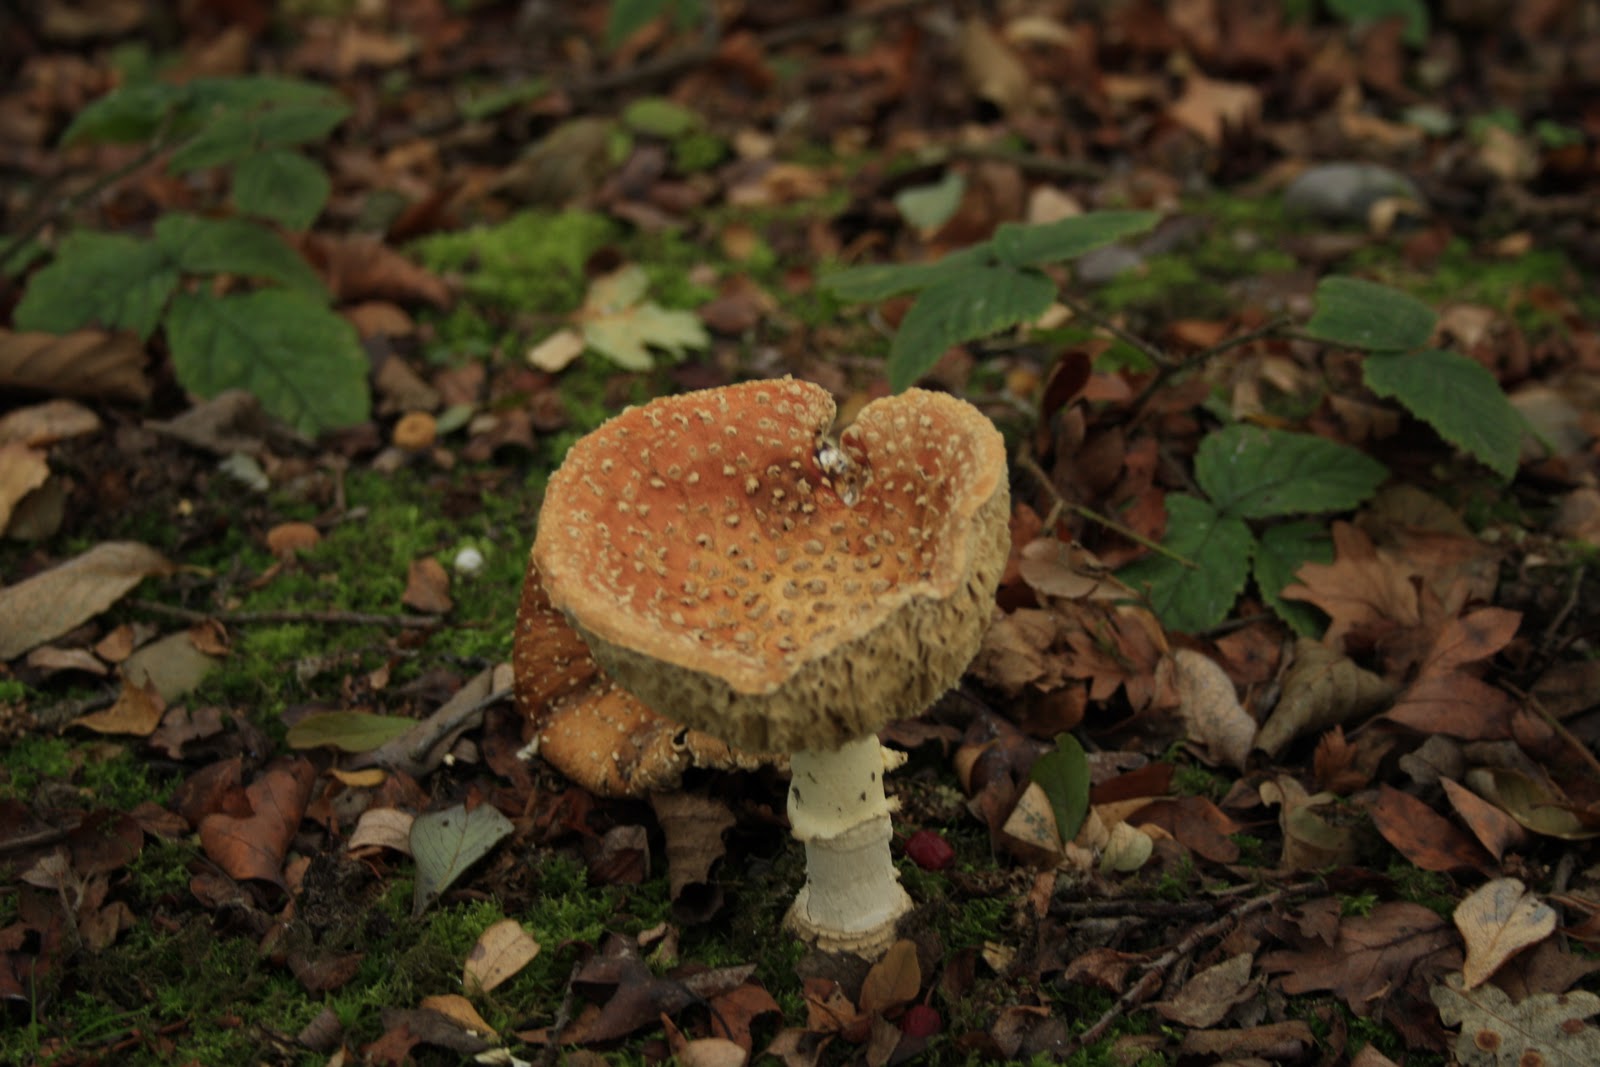
We found some really old mushrooms on the ground of the nature reserve which were so unusual and interesting so I took some shots of it at different angles and heights.

Shutter speed = 1/20, Aperture = f/5.0, ISO = 400
These images were taken without a tripod which I was worried about but the images came out quite well. The focal point is obviously the mushrooms but your eyes are also drawn outwards to the leaves and moss on the ground.

Shutter speed = 1/20, Aperture = f/5.0, ISO = 400
I like the angle of the image above and how you can see the features and details of the mushrooms really clearly.

Shutter speed = 1/20, Aperture = f/4.5, ISO = 400
This image was taken literaly lying on the ground which helped to steady the camera as well as get a good angle and composition.

Shutter speed = 1/20, Aperture = f/4.5, ISO = 400
This was taken lower down and the subject was even closer to the camera. I love the detail on the mushrooms and how the mushroom on the right is slightly blurred, I feel it adds a different effect.

Shutter speed = 1/20, Aperture = f/4.5, ISO = 400

Shutter speed = 1/20, Aperture = f/4.5, ISO = 400
I wanted to take a portrait image of the mushrooms to see the difference it made. This way I was able to capture more of the background and really experiment with the depth of field. I like the natural tones and composition of this photo and I feel it gives a 'soft' feel and its very natural.
I feel I have learnt alot from this session and I will take what I have learnt from this into my next images so that I can continue to get better. This was the first time I have used a fully manual camera which I found challenging at times, especially with the change of light and depth of field. But taking that into consideration I think I have done quite well but I always strive to be better and hopefully I will.
Health & Safety on the shoot
With it being very early in the morning when we arrived at the location it was still very dark so we all decided to stick together and move slowly through the nature reserve so that we wouldn't get lost. Fortunately Ian had been to this location many times so he led the way.
Once we had arrived at the spot we wanted to take photographs from we all stayed relatively close to eachother so that no-one would get lost. Also, with the shots of the lake being taken on the watersedge we had to be very careful when taking the images so that we didn't end up falling into the water! Therefore we just kept a safe distance from the edge and also kept our equipment away from the water so that it didn't get damaged or get wet.
With it being early hours of an October morning it was also very cold so we had to make sure that we were all wrapped up warm so that we could stay as long as possible to get the shots we required.